One mystery that has gone unsolved for the longest time now is the dirty bit on hard drive volumes. Basically a dirty bit is just a 1 hex value located somewhere hidden on the hard drive that Microsoft has never reveal until recently. Windows will check the dirty bit to determine if a volume can contain corrupted files due to hard resetting your Windows computer with files that are still opened or when you unplug a USB flash drive that is in the midst of copying a file.
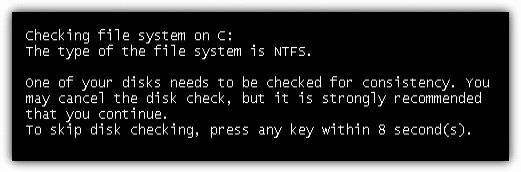
When the computer boots up with the dirty bit enabled on a hard drive, you will be asked to check the disk for consistency before Windows is loaded. You can skip the disk checking by pressing any key but it will come back again the next time you start up your computer. This will usually keep happening until you let the drive be scanned or alternatively you can tell Windows to stop checking the specific drive. This method doesn’t clear the dirty bit on the drive though and simply forces Windows not to scan a drive on boot.
As for a USB flash drive or portable hard drive with the dirty bit enabled, plugging the drive into a Windows 7 computer will prompt a window that asks:
Do you want to scan and fix Removable Disk (G:)?
There might be a problem with some files on this device or disc. This can happen if you remove the device or disc before all files have been written to it.
If you close the popup or select “Continue without scanning”, then this popup will continue to haunt you until you decided to click the recommended Scan and Fix option.
There are guides on how to disable the scan and fix window by disabling the Shell Hardware Detection service but that really isn’t a viable solution since you’re telling Windows to ignore the problem rather than fixing the problem itself.

There is a tool called fsutil.exe in Windows which can be used to check if a volume is dirty and can even be used to manually set a drive as dirty which will force the requests to scan it, but weirdly it cannot be used to clear the dirty bit. Someone has already reverse engineered the fsutil.exe to confirm it.

So there seems to be 2 solutions to clear the dirty bit which is to trust the Microsoft disk checking utility by completing a check disk OR you can move the data away from the volume, format the drive and then move it back. Going with the first option would risk losing some of your files when the scan disk decides to turn them into CHK files. The second option is safer but takes a lot of time if you have a lot of files to move.
Here is a third method, and we’ve spent several hours locating the dirty bit on NTFS and FAT16/32 file systems so that we can manually reset or clear the dirty bit with a hex editor that supports disk editing. As we said earlier, the dirty bit is simply 1 hex value on the disc volume that needs to be reset and is easy to change again in future once you know how.
We’ve tried a total of 13 different hex editors which are wxHexEditor, HxD, 010 Editor, CI Hex Viewer, iBored, HexEdit Pro, Hackman Suite, DMDE, Hexprobe, FlexHEX, ADRC Hard Disk Hex Editor, WinHex and Hex Workshop. Only DMDE, WinHex and Hex Workshop were the editors able to write the data back to the disc but the last two are shareware tools. HxD is certainly one of the easiest tools to use and can make the needed changes but is a bit slower because it needs to manually search the drive for some values.
On Page 2 we’ll show how to clear the dirty bit for NTFS, FAT32, FAT16 and locked volumes.