
Move Windows XP Hard Drive or Change Motherboard Without Getting a Blue Screen STOP 7B Error


 6 min. read
  Published on

One feature that was useful in Windows versions prior to XP was you could simply take out a hard drive that has Windows installed and connect it up to another computer. When it boots it up, it’ll start to detect and install all device drivers again. When you change the motherboard or move your hard drive that has Windows XP installed to another computer, be prepared to get endless looping reboots or the famous blue screen of death (BSOD). The error will usually be a STOP 7B error which is related to a problem with the hard drive controller.
This problem is often simply due to the fact that the storage controller used by Windows XP requires a different driver depending on what type of hard drive controller is on the motherboard. If the old controller uses one driver and the new controller requires a different driver, XP is trying to boot with the old driver and throws up the blue screen because the wrong driver is trying to load. The recovery console or even Safe Mode isn’t usable because Windows can’t boot anything without the correct software for the controller. The only real hope you have of this problem not occurring is to use a motherboard with exactly the same chipset for the hard drive controller.

After all these years since the release of Windows XP, it’s still not a straightforward task to move a Windows XP hard drive and partition to another computer without getting a blue screen. There are some easier ways to do it although they cost a fair amount of money. Amazingly, a large proportion of websites on the internet (including Microsoft) will tell you the only solution is to perform a Repair Install or even completely wipe your XP install with a format and re-install.
Thankfully there are ways around the issue. You can firstly avoid this problem before moving XP to the new computer or motherboard if you know what to do, and secondly the problem is still fixable even after you have moved XP to the new hardware configuration. Here’s how to do it.
Before Moving the Hard Drive or Removing the Old Motherboard
This is obviously the much more preferable method because it will stop you getting the problems after moving to the new hardware and requires the usage of no extra software.
1. Go to Control Panel and open System.
2. Click the Hardware tab and then click the Device Manager button.
3. In Device Manager expand “IDE ATA/ATAPI controllers” by clicking the + sign.
4. Right click on the FIRST controller in the list and select Update Driver, it should be the one with a manufacturer name, such as VIA or Intel etc.

5. Select “No, not this time” when asked “Can Windows connect to Windows Update to search for software?” and click Next.
6. Select “Install from a list or specific location (Advanced)” and click Next.

7. Select “Don’t search. I will choose the driver to install” and click Next.
8. Select “Standard Dual Channel PCI IDE Controller” and click Next.

9. Click No when ask to restart. Now shutdown the computer, remove the hard drive and install it on another computer, or replace the old motherboard. As you’ve probably worked out, this solution simply reverts the driver back to the standard Microsoft controller driver you would have on a clean install. Do note this method won’t help if you’re trying to use the XP drive on an AHCI enabled target system. You need to make sure the BIOS is set to IDE or standard SATA mode.
On Page 2 we’ll show you the solution if you’ve already connected the XP hard drive to the target motherboard/system.
After Moving the Hard Drive or the Motherboard Change
There are 2 different Boot CD’s that can do this for you, Hiren’s Boot CD (v10.2 and newer) and Ultimate Boot CD 4 Windows (UBCD4Win). The Hiren method is easier because it doesn’t require any software to be installed on your system or a Windows XP install CD. Here are the instructions for both, you obviously need access to a working system for this to work.
Using Hiren’s Boot CD
1. Download Hiren’s Boot CD and burn the ISO to a CD if you don’t have it already. Alternatively write Hiren to a bootable USB flash drive.
2. Boot up the computer with Hiren. You need to go into the BIOS to change the boot sequence if your computer can’t boot up the computer with a CD, or press a hotkey such as F11 to reach the boot device selection dialog.
3. Select the second option down, “Mini Windows XP” from the menu and load Mini XP.
4. Once loaded, click on the Hiren menu icon in the system tray and go to Registry -> “Fix hard disk controller (fix_hdc.cmd)”.
5. Press the T key, then enter and type in the TargetRoot folder. The default would be C:\Windows but might be different on multiboot systems, in which case you would need to check in Windows Explorer what the correct drive letter is.
6. Hit the M key on your keyboard to select Update MassStorage drivers and press enter.

7. When it’s finished, press any key to continue and restart the computer.
Using UBCD4Win
1. Download latest UBCD4Win and install.
2. Launch UBCD4Win from the Desktop or Start Menu.
3. Insert an original Windows XP CD into the CD/DVD drive and select the source. To confirm that the source is correct, click on Source from the menu bar and select Check.

4. If your computer can burn CD’s, select Burn to CD/DVD and click the Build button. If it can’t, select Create ISO image and once it has completed creating the ISO image, copy it to a computer that can burn CD’s and burn it.
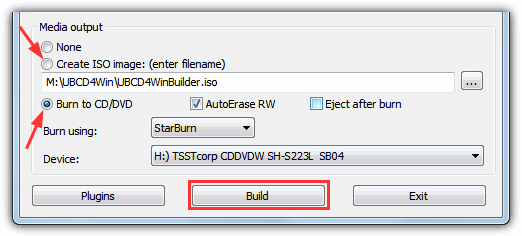
5. Boot up the computer with UBCD4Win. You need to go BIOS to change the boot sequence if your computer can’t boot up the computer with a CD.
6. Select Launch “The Ultimate Boot CD for Windows” from the UBCD4Win menu and wait for it to load. You can select No when asked to start network support.
7. Click Start -> Programs -> Registry Tools -> Fix_hdc -> Fix hard disk controller.

8. Hit the M key on your keyboard to select Update MassStorage drivers.

9. When it’s finished, press any key to continue and restart the computer.
Good luck and hopefully that you are now able to move Windows XP hard drive to another computer with either of the methods above.
These days there is another way to achieve a similar result which is through backup software such Acronis TrueImage and EaseUs Todo Backup. These programs are able to restore backups to dissimilar hardware meaning you can move an image from one computer to a system with a completely different set of hardware. The hard drive controller is automatically switched to the Microsoft default driver during the transfer, so the computer should boot straight up without the need for a third party boot CD.



Improve this guide

User forum
0 messages